Showing posts with label nuts. Show all posts

Saturday, January 8, 2022

Ricciarelli di Siena, and homemade/recycled Christmas decorations


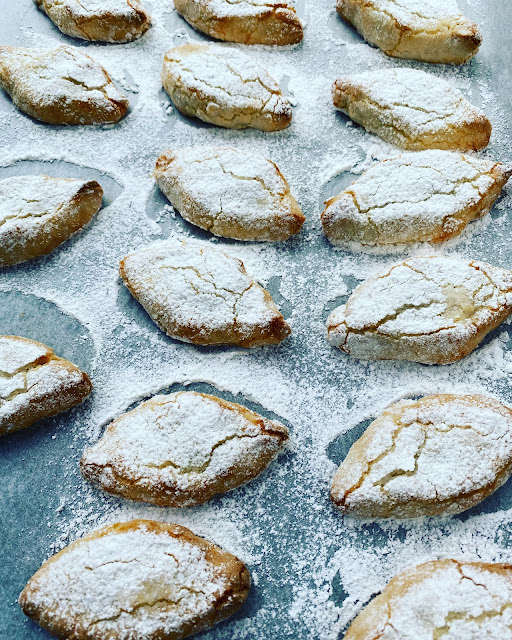
Ricciarelli are delicious Italian (Tuscan) almond sweets, apparently originated in the XIV century.
Making them in New Zealand is quite special, as they really give Xmas an Italian flair. Bitter almonds are one of the ingredients though, and I have not found them here, so I added just a few apricot kernels (be careful, they are poisonous so you just need a tiny amount, and they MUST be blanched). Of course this is optional, you will get great results just with regular almonds.

200 gr of almonds
about 6 to 10 apricot kernels
200 gr of sugar
2 egg whites
zest of an orange or a tbsp of candied mix citrus peels
Possibly some more ground almond if the mixture is too wet
plenty of icing sugar to roll and dust

Blanch the almond and the apricot kernels separately in hot water and remove the skin. 
Place them in the food processor with the sugar and grind to a powder. Do this in two lots, on pulse, making sure that the mixture doesn't heat or becomes a paste.

Lightly whip the egg whites, just gently, they don't have to be stiff like for a meringue, just starting to be white. Add the ground almonds and the orange zest or candied citrus peels. Mix well, if it feels too soft add a little ground almond. Cover and place in the fridge overnight.

The day after flour a board or working surface with icing sugar and roll the paste into thin rolls, about 2-3 cm thick. Cut and shape into biscuits, about 1.5-2 cm high. the traditional shape is like a grain of wheat, with two pointed ends. 

Place on a oven tray lined with baking paper and sprinkle with more icing sugar. Bake at 150C for 15 minutes or until the edges start to be golden. Ricciarelli should not be overcooked! Let them cool down completely before removing them from the baking tray. They keep well for a couple of weeks in a biscuits tin. 


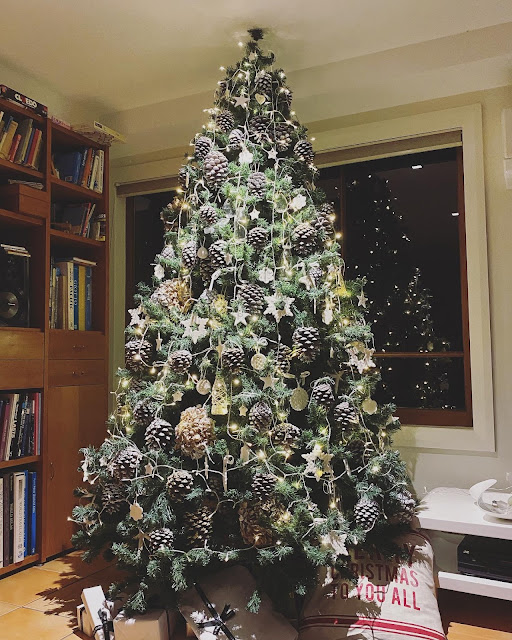
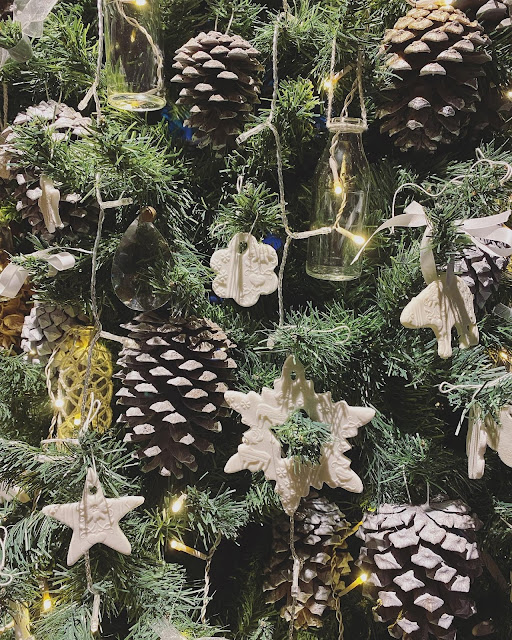
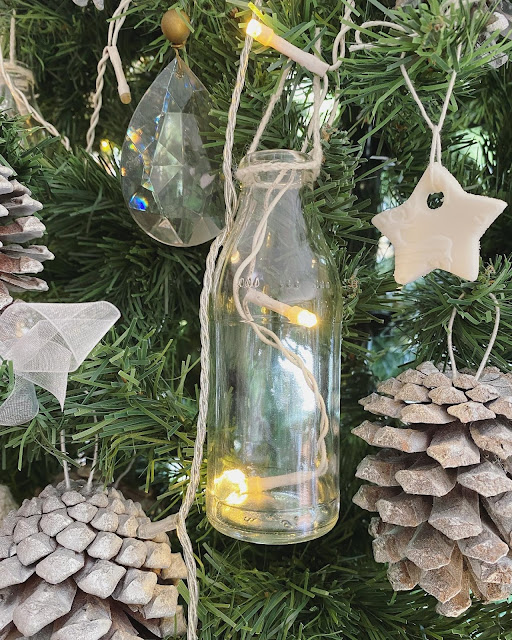
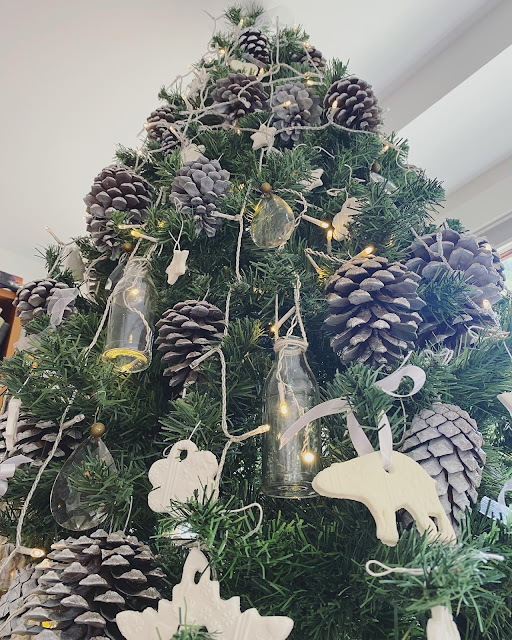
All the decoration on this Xmas tree are homemade or recycled.


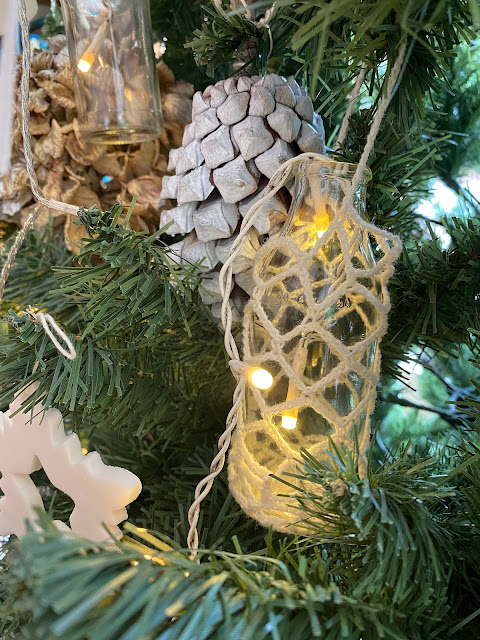
I recycled small bottles fro Italian fruit juices and crochet around them to make lights. I used recycled old wool for the crochet, and also made a few balls and little doilies. I foraged and painted the pine cones, and also spray painted some dried hydrangeas flowers. And then my usual sugar decorations, made with fondant, all white this year! Finally I recycled the crystal drops from a broken chandelier, they look classy on the tree!


 Photos and Recipes by Alessandra Zecchini ©

Tuesday, March 9, 2021

Homemade Labne with homemade dukka and edible flowers


Labne cheese is basically strained yogurt. I use Cyclops organic yogurt (green top) which I find to be the best for making labne. Use think plain yogurt which is just yogurt (no added gelatin or other thickeners).

To strain the yogurt I used a cotton cloth, not too fine, but finer that a muslin cloth or cheese cloth. Tight well and hang in the fridge with a container underneath to collect the liquid. Leave it for at least one night and one day. Two days if you can.

To make dukka put some almonds in a skillet and toast quickly, then add pumpkin and sunflower seeds and toss in the hot skillet for one more minute, finish with the coriander seeds, which will need only one minute. Cool down and place in a mixer (keep a few almonds and seeds aside for decoration) with a good pinch of salt, and if you like some smoked paprika. Ground. Place the labne on a platter, cover with dukka and the whole seeds and before serving add rosemary flowers and friarielli or broccolini (or similar brassica) flowers.

Photos and Recipes by Alessandra Zecchini ©

Monday, April 30, 2018

Colomba Sestolese - A traditional sweet pie from my Italian village in the Apennines - step by step photos and instructions


This cake is traditionally made in Sestola on 6 December for St Nicholas' Day, so I am totally out of season here, but I have a good excuse: my friend Stefania gave me a jar of jam she made with rusticane plums, and the flavour was just right, not too sweet and a little sour... just like the plum jams they make at home, and an essential ingredient for this preparation. Please note, this is a VERY ITALIAN CAKE, not one that Kiwis may like as in this country the preference is for somewhat soft and 'moist' cakes (although my husband ate this happily, but with cream on the side!!!).


I am sure that every family has a lightly different recipe, this is mine and works pretty well. In a large bowl, or on a wooden table, measure 500 g of plain flour, 200 g sugar, 1 tsp of baking powder and 120 g of butter. Usually in Italy we use unsalted butter, so add a pinch of salt, but here in NZ I used salted butter, so no more salt is needed. Mix just a little then add 3 free range eggs and a small glass of liquor. I used Sambuca, Sassolino is best, but hard to find here, and Sambuca is a good substitute. You can also add the zest of a lemon or some citrus peels (I added citrus peels, about 1 heap tsp).


Mix well, don't worry if it feels too dry at first, you need to work on the dough and with a little patience you will get a soft dough.


Shape into a ball then cut into three pieces. Take the bigger piece and roll it (add more flour for the board/table).


Line a 20cm round cake tin with baking paper and place the rolled piece inside, building up the borders a little.


Now add about three or four tablespoons of plum jam.


Chop some almonds and chop some walnuts. You can also add pine nuts, or even hazelnuts, the important thing is always to have walnuts! 


Top the jam with the chopped almonds,


Then with walnut pieces, and sprinkle with sultanas.


Roll some more pasty and cut a circle to cover the filling, add some leftover pastry to lift the border where necessary.


Repeat! Jam, chopped almonds and walnuts, sultana...


Roll some more pastry and cut another circle to cover the filling. Always lift the border with more pastry where necessary.


And repeat for the third time: jam, nuts, sultana and one more circle of pastry. 


Use the pastry strips left over to seal well the borders with the top, I press everything down with a teaspoon for a neat look.


Make some light incisions with a fork on the top.


Sprinkle with sugar and bake at 180/200°C for about 40 minutes.


Let the pie cool down before cutting, even if the fragrance will be irresistible.


Ok, I was going to cut the cake the day after and take a great photo... but my daughter got up first and had some for breakfast.... and then it went so quickly that this is the only photo I have... anyway, you can see the three layers, and the crust is like a biscuit. It was delicious, and this is a good thing: when we make this cake in the village we have a proverb which says that if the cake is good it will be a good snowy season (mountain village you see, we need snow for skiing), and now the family hopes that this year Mt Ruapehu  will have lots of snow and a great skiing season!


 Photos and Recipes by Alessandra Zecchini ©


Wednesday, May 27, 2015

Cherry tomatoes with raw nut cheese and edible flowers


After the raw vegan mushroom and nut macaroons here is another cute raw vegan appetizer! Make a cross incision at the base of cherry tomatoes, stuff with some raw vegan nut cheese (recipe here) and decorate with herbs and edible flowers. They taste so good and are incredibly pretty!

Photos and Recipes by Alessandra Zecchini ©

Thursday, May 21, 2015

Raw Vegan Mushroom and nut 'macarons'


White button mushrooms are delicious raw, and they are vitamin rich, apparently they even have vitamin B12. These little savoury mushrooms 'macarons' make a tasty appetizer, and they look really fancy! All you need is mushrooms and some raw vegan nut cheese (recipe here). Remove the stalks from the mushrooms and peel off the top 'skin', the clean them well with a damp paper towel (do not wash). Fill with a little vegan nut cheese and close together like a macaron.  


Photos and Recipes by Alessandra Zecchini ©

Saturday, May 16, 2015

Raw Vegan Nut Cheese


This is commonly called Vegan cheese or nut cheese, although to me it feels more like a very 'intense' dip. Full of protein and spreadable, it stores well for a couple of weeks in the fridge.

Ingredients:
120 g cashews
80 g macadamia
1 small shallot
2 tbsp lemon juice
water (just enough to blend the nuts)
salt and pepper to taste

Soak the cashews for 4 hours, drain and place in a food processor (or use an immersion blender). Add the shallot, peeled and chopped, lemon juice and a little water. Blend until smooth, adding more water if necessary. Add salt and pepper to taste (I do this little by little while blending).

Store in the fridge.

Happy Weekend!


Photos and Recipes by Alessandra Zecchini ©


Sunday, August 3, 2014

Florence Fennel and avocado salad with walnuts


This is a lovely salad and also a light main, filling, nutritious and full of different textures and flavours!

For two serving use:
1 medium Florence fennel, sliced
1 avocado, sliced
1 small carrot, grated
A little red cabbage, finely chopped (this is mostly to add a dash of colour, red radicchio would work well too!)
8-10 walnut kernels, crushed
A few drops of lemon juice
Extra virgin olive oil and salt to taste (optional)

Usually I just put the lemon juice on the avocado and the carrots only, and then assemble the salad, and it taste great even without salt or olive oil (avocado and walnuts are full of good fats anyway).


Photos and Recipes by Alessandra Zecchini ©

Thursday, July 3, 2014

Raw, vegan, sugar free and gluten free chocolate truffles


Yes these are raw, vegan, sugar free and gluten free chocolate truffles, but what's more they are made using only 4 Fair Trade ingredients: Trade Aid Palestinian almonds, Trade Aid cinnamon, Trade Aid Madjoul dates, and Trade Aid baking cocoa,  plus one local ingredient, Hazelz hazelnut flour from Canterbury. There is no sugar, no dairy product, and no need for cooking. And although this is not a baking recipe I still like to propose it for The Big Fair Bake, although I may actually enter a proper baking recipe later on… time permitting :-).


I like using Fair Trade products because they are in line with the Slow Food principles of Good, Clean and Fair food. And with my philosophy. Furthermore the quality is really good! Take the Medjoul dates for example, they are so sweet and delicious, they can substitute sugar in many preparations. The baking cocoa is so good that you don't need to use it just for baking, it is perfect for puddings and hot chocolate too. The Palestinian almonds are different from my favourite Italian almonds, but they are quite unique, a bit spicy in fact. The cinnamon really aromatic, you need just a tiny bit, I like to say 'a hint' :-). And the hazelnut flour is what's keep everything together so nicely! 


Ingredients:

4 Trade Aid Madjoul dates
20 Trade Aid Palestinian almonds
50 ml water
1 hint (i.e. a tiny pinch) Trade Aid cinnamon
1 tbsp Trade Aid baking cocoa, plus more to dust
2 tbsp Hazelz hazelnut powder, plus more to dust

Makes 12 truffles

Remove the stone from the dates and break up in rough pieces. Place in a cup with the almonds and 50 ml of water. Wait for 30 minutes to let the fruit soften a little and then blend with an immersion blender. 
Add the cinnamon, cocoa and hazelnut powder and mix with a spoon. Shape into 12 balls and roll half in cocoa and half in hazelnut flour. The best way to do this is roll the truffles first in cocoa or hazelnut flour, and then pass them between the palms of your hands quickly a few times so that you will get an even coating, and not too much of it, just the right amount. No need to refrigerate, just let them dry a bit on a tray before piling them into a serving bowl or glass.


Sweet NZ image
I like to enter this post for Sweet New Zealand #36, the blogging event open to every one blogging in NZ, and all the Kiwi bloggers living overseas! This month of July is hosted by Libby at Ditch the Carbs. Click here to enter! Libby, I hope that this is your kind of sweet treat!! 


Please Support Fair Trade!


 Photos and Recipes by Alessandra Zecchini ©


Friday, June 6, 2014

Homemade mascarpone with honey, pistachio and dried strawberries


Making mascarpone at home is one of my favourite occupations these days! A part from the 'magic' of it, and the resemblance to a chemistry experiment (I made this with Max, actually, he made it with me in the background giving instructions and liked doing it!) it is also so much cheaper, fresh and delicious that the one you buy! 


For the mascarpone recipe just click here, it is easier that you may think! When the mascarpone is ready just add a tbsp of honey (I used Tawari) and fold. Divide the mascarpone into 4 cups and it is ready to be eaten or topped with what you fancy. 


This time I just toasted a few pistachios in a pan, then I rub them with a tea towel to take away loose skins and chopped them coarsely. Then I also added some Fresh As dried strawberries, crunchy and full of flavour and aroma. A simple dessert that everyone loved!


Photos and Recipes by Alessandra Zecchini ©


Sweet NZ image
This recipe is for Sweet New Zealand #35, the blogging event open to all Kiwi bloggers (living in NZ or overseas) and expats blogging from NZ. June's host is Amanda from Move Love Eat  Click here to share you sweet creations with the Sweet New Zealand team! Also let me know if you are keen to be a host in 2014, and book a month for you!


LinkWithin

Related Posts with Thumbnails