Thursday, October 31, 2013

Pasta with asparagus and cream sauce


More asparagus! For the pasta I used penne, and for the sauce:

1 onion
1 bunch asparagus
2 tbsp olive oil
1 glass white wine
salt to taste
200 ml cream
black pepper
chopped Italian parsley
Parmesan to serve (optional)

Finely chop the onion and the asparagus spares (keep the tips aside). Sauté the onion and asparagus spares with the olive oil, when they start to colour add the white wine, then cover and simmer, stirring from time to time and adding a little water when necessary. Simmer for at least 30 minutes, better if longer: the onion needs to be really soft. Add salt to taste. Add the cream and then the asparagus tips and simmer for a few minutes until the cream bubbles. Add freshly ground black pepper, chopped Italian parsley and the penne pasta, cooked al dente and drained (a little of water from the pasta is good too for a creamier sauce). Serve immediately, with parmesan cheese if you like.

And to finish today post: sweet smelling rambling roses from my garden.


Photos and recipes by Alessandra Zecchini ©

Wednesday, October 30, 2013

Asparagus and Halloumi filo rolls


These are much better than asparagus rolls (although I confess that I don't like asparagus rolls, I only eat them if I have to, i.e. I go to a 'high tea' and the only vegetarian sandwich are... asparagus rolls! High teas are not very imaginative in this part of the world). So yes, I like to boast that these are 100 times better than asparagus rolls made with buttered white bread! 

I got the idea after doing this (another invention of mine :-)) and I though of adding a lightly steamed asparagus to each roll, and just a little Halloumi. For each roll you will need only one sheet of filo pastry, roll it up like a spring roll (closing the ends), brush with water (you can use melted butter or olive oil, but water is fine and no fat!) and bake until golden. Easy to make and I can assure you that these will go like hot cakes!


Photos and recipes by Alessandra Zecchini ©

Tuesday, October 29, 2013

Vegan Cabbage Bolognese Sauce


This is not a quick recipe, but require slow cooking, so if you are in a rush just look at the pictures :-).

There are several vegan Bolognese sauces around, mostly using soy or fake mince, and some with lentils, but I wanted to try one with cabbage, which is not a veggie I particularly like myself, but it is highly nutritious. It came out better that I hoped!

Ingredients
Half a cabbage
1 large carrot
2 sticks of celery with leaves
1 large onion
1 garlic clove
A few Italian parsley leaves
3 tbsp extra virgin olive oil
1 glass wine (white or red)
1-2 tbsp tomato puree
1 l vegetable stock
salt and pepper to taste
more extra virgin olive oil to serve

With a food processor finely chop the vegetables, then put in a pan with the olive oil and sauté for a few minutes. Then add the wine and stir well. Add the tomato puree, cover and cook slowly, stirring from time to time and adding the vegetable stock little by little. Simmer for one to two hours, the more the better, I think I went over two hours. I started in the afternoon but by the time I took the last photos it was dark, so the images are a bit blurry, sorry!


Taste and add salt and pepper to taste (I like it with quite a bit of black pepper!), then use to top your pasta, drizzling with more extra virgin olive oil. Enjoy! This can also be used to fill pies.


Photos and recipes by Alessandra Zecchini ©


I would Like to thank Chiara from La Voglia Matta for having me, and this recipe, as a guest in her series Blogs Got Talent! 

Monday, October 28, 2013

Long weekend and Pinterest referrals


Labour weekend, I planted my tomatoes (and other seedlings) and I am a little behind with photos to download and recipes to post, but time seems to be a constant issue these days. So I am just posting a couple of pics of orchids to keep up with my Pinterest Board, which after all gives me about 100 referrals each day (and flowers are easy to photograph... no need to cook them first!). But next post I hope I can download flowers from my gardens, as this orchid is not (a lovely present though, so it is good to keep a photographic record). Do you have a Pinterest Board?


Photo by Alessandra Zecchini ©

Friday, October 25, 2013

Asparagus and onion weed soup with flowers


This is so easy to make, but looks impressive and tastes delicious.

Ingredients

1 big agria potato
1 bunch asparagus
3-4 onion weeds with flowers
1 l vegetable stock
nasturtium flowers and baby leaves
sage flowers
violet flowers

Peel the potato and cube. Clean the asparagus, remove the woody stalk ends and cut into small pieces keeping the tips aside. Clean the onion weed, set the flowers aside and cut the stalks. Place potato, asparagus spares and onion weed stalks in a pot with the vegetable stock and simmer until all the veggies are soft. Add the asparagus tips and blanch. Remove the asparagus tips and blend the rest of the soup. Serve and top with the whole asparagus tips, decorate with nasturtium flowers and baby leaves, sage flowers, violet flowers and onion weed flowers. Eat everything!


Have a happy long weekend (if you are in NZ)!


Photos and recipes by Alessandra Zecchini ©

Tuesday, October 22, 2013

Beam Legendary Aperitivo Round in Auckland

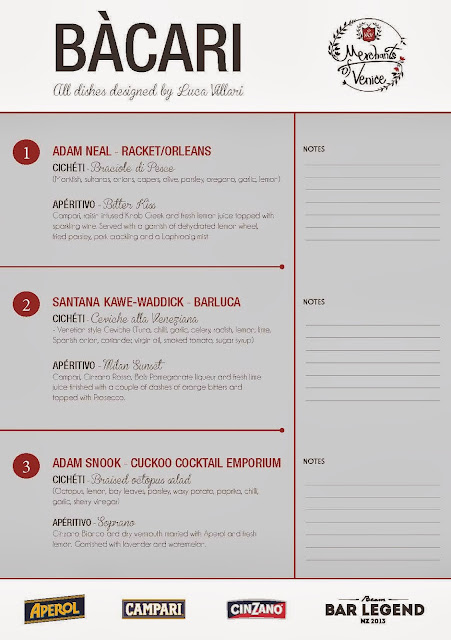
Sunday night I went with three Italian friends to round three of the Grand Final of the Beam Bar Legend, New Zealand’s biggest bartending competition. This round was the Italian themed “Legendary Aperitivo Round”, held at  at Merchants of Venice in Wynyard Quarter.
The 6 finalists were required to make a drink using one of the Campari range including Campari, Aperol, Cinzano or Frangelico and match it to a Venetian Cicheti  (these are small dishes, a bit like tapas) created by Luca Villari.

There were 6 rounds with 6 drinks up for tasting, and at the end the 40 guests voted on their favourite to determine the winner of the evening. Our table was "the Italian Table", and we took our job very seriously 
:-) (well, we were the only Italians there, all missing our aperitivo back home!).

We started off with a Spritz (not included in the 6 to taste!) and by studying the tasting menu for aperitivi and cicheti

Bartenders busy at work and my Italian tasting team (Valentina, Ermanno and Jacopo) busy at... tasting!


The menu 


This was the winning aperitivo for the evening, but to find out who won the New Zealand's best bartender click here

Photos by Alessandra Zecchini©

Sunday, October 20, 2013

A quick Bibimbap after sailing


Bibimbap is a Koran dish based on rice, and possibly Korea's most famous 'comfort food'. Plain rice is topped with a variety of ingredients, then the diners add chili paste and mix it just before eating. There are many types of bibimbap, some quite complex, other just made with left-overs. This is a very simple one, made quickly after the boy came home for sailing, starving! I cooked some short grain rice, then added some spinach sautéed with sesame oil and a pinch of salt on the side. Topped with a fried egg and some nori seaweed (this nori has been cut to resemble cherry blossom). I usually add some grated cucumber but I didn't have any. To finish add chili paste or sauce to taste, mix and dig in! Quick, delicious and filling!

Photos and recipes by Alessandra Zecchini ©

Wednesday, October 16, 2013

The Garden in McCahon House Museum, French Bay, Titirangi


French Bay has the closest beach to my house, small and cute, with a yacht club, plenty of bush, and the house of one of NZ most famous artist: Colin McCahon. It is a House Museum, so you can visit it, and if you are an artist you may even be able to stay there: go here for more info.

French Bay

I love the mix of bush and flowers, the smell of Titirangi.


Photos by Alessandra Zecchini©


Tuesday, October 15, 2013

National Honey Week, an opportunity for NZ food bloggers

I received a press release today about the First National Honey Week in NZ, and I though of sharing an extract from it with my fellow NZ bloggers. If you like honey read on! 


Photo by Alessandra Zecchini©


National Honey Week will take place for the first time this year from 25 November – 2 December to raise awareness and support of New Zealand’s sweetest natural resource and to encourage more Kiwis to include it in their diets. Led by Airborne Honey, the country’s oldest brand, a number of promotions and initiatives have been planned to help consumers take part in the celebrations.

Each year, a different hero honey will be highlighted. Manuka is this year’s star.  

New Zealanders will be encouraged to take part in National Honey Week through a series of contests and giveaways on Facebook and Twitter. On top of that, New Zealand food bloggers will be able to enter their honey themed recipes into a “Cook Something Yummy with Honey” competition during National Honey Week. Among a host of other prizes, the winner will receive a behind the scenes experience at Vinnie’s and a luxurious meal for two. 
 
There are a number of delicious ways to incorporate New Zealand Manuka honey into daily life. So why not start now!

  1. Honey is much sweeter than table sugar. Substitute your daily teaspoon of sugar for a drizzle of Manuka honey in your cup of tea in the morning.
  2. Honey isn’t just for toast! Use Manuka honey in savoury dishes and marinades. The rich, malty tones make it perfect for stir-fries.
  3. Honey can help counter the effects of the 'morning after'. A simple hangover remedy can be made quickly and easily by blending 15ml orange juice, 150ml natural yogurt and 2tbsp honey.
  4. Make sure your honey is the real deal and good quality by checking the label. Look for the pollen percentage (a high percentage means the honey is true to type – Manuka should contain at least 70% Manuka pollen), HMF number (lower the better, HMF numbers below 10 are best as a high number means the honey is heat damaged) and place of origin.

Monday, October 14, 2013

Japanese side vegetables with mushroom and mochi


I love the simplicity and clean taste of Japanese side vegetables, it doesn't matter what you use really, the secret is to cook (or better, blanch) the veggies separately so that they retain their own taste. Here I blanched the carrots and snap peas separately, but I kept the two broths and mixed them together as the base for a miso soup (never trow away anything!).
I cleaned the mushrooms and cooked them in a pan with a little butter, then I added soy sauce and lemon juice. Then I used the same pan to sizzle some small cubes of mochi (rice cakes) on all sides (the centre becomes soft while the sides pick up the mushroom-soy sauce-lemon-butter flavor). Decoration: Onion weed flowers (edible!).

Photos and recipes by Alessandra Zecchini ©

Thursday, October 10, 2013

Alpine strawberries and Forget-me-not


In my garden right now... a part from lots of onion weed (edible), Alpine strawberries are starting to pop up, just enough for a 'shot' dessert of yogurt, honey, and tiny wild strawberries. It looks good next to another garden treasure: sweet forget-me-not, among my favourite little flowers. Both strawberries and flowers makes me think of home in Italy, where they grow wild everywhere at the beginning of Summer. And I love the colours!


Photos and recipes by Alessandra Zecchini ©

Tuesday, October 8, 2013

Ochazuke, Japanese comfort food


When I was teaching Italian in Japan I once asked my students to tell me what was the typical Japanese dish they had for dinner, one answered ochazuke, and everybody laughed! Ochazuke meant that you lived alone, or your mum/wife was out for the night and you couldn't cook. Or that you run out of money! For homework they had to write a description of Ochazuke (in Italian) and the week after they came with their recipes and, most surprising for me, they all brought a sachet of flavoring for ochazuke, for me to try. The basic idea is to use leftover plain rice and top it with hot green tea, and then some toppings (and these where the sachets, a bit like furikake, but with green tea added, so that you just needed hot water). Most of the students in that class were young and lived by themselves, thus the need of quick comfort food, and they always had left over rice, and possibly a sachet of seasoning. I got to love ochazuke, but rather than seasoning from a sachet I use some chopped-up nori, some wasabi or ume plum, salted sakura flowers, dried shiso... anything I have at hand really, and then some green tea. 


Photos and recipes by Alessandra Zecchini ©

Saturday, October 5, 2013

Vanilla Cupcakes with Italian Butter Icing


Here is a recipe from my book Party Food for Girls, I haven't made it in a while, but I needed a sugar hit, and I just felt like baking... it happens!


Vanilla Cupcakes

Ingredients
120 g butter
3 eggs
130 g sugar
1 tsp vanilla extract or vanilla paste
200 g self-rising flour
60 ml milk
Italian butter icing for the topping (recipe on page…)
Fresh or sugar flowers to decorate (optional)

Makes 12 cupcakes

Preheat the oven to 175°C. Line a 12-muffin tray with cupcakes paper cups.
Melt the butter in a jug, either in the microwave or in the oven (while the oven is warming up for the cupcakes). Place the eggs and sugar in a mixing bowl and whisk, using an electric beater, until the mixture looks light and pale yellow in colour. Slowly add the melted butter and the vanilla essence or paste. Keep beating at a low speed now; add half of the flour followed by half of the milk. Add the rest of the flour and milk and keep beating making sure that there are no lumps. Divide the mixture between the 12-cupcake cases
Bake for about 18-20 minutes, until golden brown at the top. You can also check by inserting a toothpick into the cupcakes: if it comes out clean the cupcakes are ready. Remove the cupcakes from the tin and let them cool down.
Prepare the Italian Butter Icing (recipe below) and decorate your cupcakes.


Italian Butter Icing


Ingredients 
160 g unsalted butter
2 egg whites
160 g sugar
10 ml water
A few drops of pure vanilla essence


Cut the butter into small cubes and set aside at room temperature.
Beat the egg whites until they form a white peak, and then add 100 g of sugar and beat for 10 more minutes.
Put the remaining 60 g of sugar in a small saucepan (possibly use a single-handle saucepan or a milk pot, which are easy-to pour). Add 10 ml of water to the sugar. Place the saucepan over the stove at a very low heat and bring it to boil. Simmer for 2 minutes, stirring gently with a metal spoon, and making sure that the sugar doesn’t stick to the edges of the pot. The sugar should melt but still look white. Don’t boil it for too long or it will turn into brown caramel; if this should happen wash the pot with warm water and start again.
Resume beating the egg whites and very carefully (don’t burn yourself) pour in the sugar syrup. Beat until the meringue is cold and then turn the speed of the beater to the lowest setting. Add the butter, little by little and beat it in until well mixed. Add the vanilla essence and beat for one more minute.
Scoop the icing into a decorating pastry bag and decorate the cupcakes as shown in the pictures.

And this is the cover of the book, the very same recipe, with the difference that at present I don't have many edible flowers in the garden a part from a few violets. Next time I'll wait to have lots of flowers, as they are the prettiest decoration ever!

I am a finalist in the 2013 Culinary Quills Award!


I am entering this recipe in Sweet New Zealand, the monthly blogging event for Kiwi bloggers. Our October 2013 host is Lucy from Lucy eats, click here to enter. Sorry Lucy, I meant to do a sugar free dessert and this is not! But I may have time for another sugar-free entry this month! :-)

Photos and recipes by Alessandra Zecchini ©


LinkWithin

Related Posts with Thumbnails