Friday, January 15, 2010

Win a copy of Savour: Irresistible pizzas, pies, tarts and bread

I am off for a few days holiday in Taupo, so probably I will not be able to post anything. But I do like to offer another book, this one is about savoury food, lots of baking, over 100 recipes, vegetarian and vegan, and a few surprises like how to make your own mozzarella :-)
All you have to do is follow me here, or on Only Recipes (or put your avatar among the followers/supporters on both blogs for a double entry). If you are already a follower you are in!
By next Friday you will know who is the winner!
Good luck!
Alessandra
Update:
Dear all, I have the house full of children so I did my hat thing again and the winner is...Arfi of HomeMadeS
Congratulation Arfi, and thank you all!

Monday, January 11, 2010

How to rescue a spider, and yellow beans

He has been lurking around the home for days. I have seen bigger, but still, they are often in the bush, or in the shed, or somewhere where we can leave them alone. Instead this 'little' Avondale Spider (I don't know if it is a he or she, so I keep referring to 'him' as a he...and not it!) was walking around like he owned the place, and not in corners or against the wall, but straight in the middle of the corridor path, in the living room, office, kitchen...in full daylight. The French doors are open for most of the day now, I thought that he could leave on his own accord, especially after been almost stepped on a few times. I tried screaming, but he just stood there looking at me, and waited for me to step aside (me walking against the wall). But he didn't leave. My husband is away so I couldn't ask him to put him out, I kind of liked the creature, Avondale spiders are not dangerous, and they are quite cute, in an arachnid sort of way, that is. Mostly I was afraid of the cats finding him...he could not stay! So, what is a 'domestic goddess' to do? I put a plastic jar over it, and slid a piece of paper underneath, showed him to the kids, and then took him out into the garden. Bye bye Avi, please don't come back!


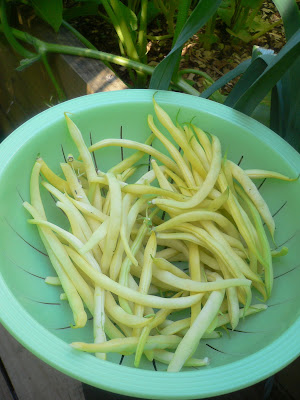
And then in the garden I saw my first yellow beans!!!


I picked them immediately, the more you pick them and the more they seem to grow, and the plants still have so many flowers on!


Initially I thought of cooking them with a tomato sauce, but then I changed my mind: they are so fresh, and the first, so I just sautéed a shallot with olive oil, added the beans (washed and top and tailed, of course) and sautéed them gently for a little. Then I added a pinch of salt, put the lid on, lowered the heat, and let them cook in their own steam for about 10 minutes (checking and stirring from time to time). I didn't need to add any water, probably because they were so fresh, and they tasted perfect!


Photos by Alessandra Zecchini ©

Sunday, January 10, 2010

More Japanese Style Recipes


Tomato Gari


A friend from a culinary forum told me that there is a new rage in Japan and it is tomato gari: a slice of tomato topped with some gari (thin slices of Japanese pickled ginger - the ones you eat with sushi) and salt. Well, I had to try it! I wasn't sure how it is supposed to look like, so the composition is my 'invention', and I used some Maldon salt (in flakes). And then I tasted it.

A M A Z I N G ! ! !

A real hit to the taste buds...but...I wanted a second...wow, still surprising...and then a third...and I was tired.

Yes, I will make it again, for some posh Japanese dinner maybe, I will serve ONE single slice per person, maybe between courses, or as a starter to wake up the taste buds. But no more. With one I think that people will remain wanting more...and they will remember it in their 'culinary memory bank' like something unique. More than that, and I feel it may be too much.


Now, for something less experimental:

Simmered Tofu Balls with Celery


I make this a lot, especially for my kids. I buy the tofu balls in the Chinese shop. They are already fried and puffy, and they are very versatile. For this recipe I just simmer them for 10 minutes with celery stalks and vegetable stock, then I lift them up from the stock (which I use as a base for soups or other things) with a slotted spoon, and I serve them, warm. They are so simple to make and yet they taste quite elaborate. I often serve them as part of a Japanese meal (as the protein dish) accompanied by a bowl of rice, a bowl of light soup, and some steamed seasonal vegetables dressed with soy sauce and lemon.


Photos by Alessandra Zecchini ©

Friday, January 8, 2010

Waiheke and Rangitoto on board of Timetama


Yesterday we left Auckland early to catch the ferry for Waiheke Island, in the Hauraki Gulf. Our friends from the yacht Timetama were waiting for us in Orapiu, at the eastern end of Waiheke Island, known by the locals as the 'far end'.


Un'altra estate nel Golfo Hauraki, ed un fine settimana con i nostri amici italiani nella barca Timetama che ci aspettavano a Waiheke, al porto di Orapiu. Naturalmente i ragazzini hanno cominciato subito a giocare e tuffarsi. 


Golly, kids have so much energy...me instead...


I ragazzi avranno anche energia, ma io volevo solo rilassarmi e chiacchierare con la mia amica.


More feet, the kids...


questo sta diventando il post dei piedi!


A bay to spend the night.
Una baia per passare la notte!


The morning after we went to Rangitoto Island which is also the largest of about 50 volcanic cones and craters in the Auckland volcanic field. It erupted from the sea around 600 years ago (now it is extinct). Rangitoto is linked by a natural causeway to the much older, non-volcanic Motutapu Island.


Chi vive ad Auckland sa che Rangitoto, l'isola vulcano, è un po' il simbolo della città, in fatti si vede in molti panorami. E secondo me è sicuramente un posto da visitare! Un vulcano spento (600 anni fa circa) con roccia nera e una bella passeggiata fino in cima!


THe red flowers are pohutukawa (also known as the the New Zealand Christmas Tree, or flower) and Rangitoto has the largest pohutukawa forest in NZ.


The lava flows left this black basaltic rock, which makes up 95 per cent of this roughly circular island, five kilometres across.


Back to Auckland


Sorry, no recipe this time, at home we just made simple spaghetti with spinach, butter and parmesan, drunk soy milk and ate chocolate ice cream...and the kids are now in bed ;-).


Photos by Alessandra Zecchini ©


Tuesday, January 5, 2010

Easy Japanese Dinner for 4


I love Japanese food, it is light and filling at the same time. It may take time to prepare, but it gives me great satisfaction, a sense of peace, and the whole family enjoys sitting at the low table, in our Japanese room, especially the children. This is a very simple fare really, it is just that 'Japanese' seems always more sophisticated: food has to look pretty, no matter what. Even a simple bowl of plain rice, served in the right atmosphere, would satisfy me! So, here we go:


Seaweed soup


Ingridients:
1 sheet kombu seaweed
1 l water
1 tbsp dried wakame seaweed

Gently scrape the kombu seaweed with the tip of a knife. Place it in a saucepan with 1 litre of water and gently simmer (simmering, not boiling) for 30 minutes. Turn the heat off and let the soup stand for 30 minutes to 1 hour (the longer the better), then remove and discard the kombu. Gently bring the soup back to a gentle simmering and add the wakame. Simmer for 5 more minutes, and serve. This soup doesn't need salt, or anything else, the broth remains clear and the taste is delicious!


Sushi rice

I find cooking rice for sushi challenging: you need to buy proper sushi rice and then wash it several times in cold water, until the water runs clear. And then cook it by absorption. The doses are about 1 and 3/4 (three quarters) cups of sushi rice for 2 cups of water, but that depends on the type of pot. You need a pot with a good lid, or you will loose too much steam. I kind of regulate myself by ear now, since I know my pots and pans. Bring the pot to boiling point, lower the heat and simmer until all the water has been absorbed. Once the rice is ready pour it into a bowl and stir it with a wooden spatula, cooling it with a fan if you can. I then add some ready made sushi vinegar, about 2 tablespoons, but this is my personal taste. If I don't have sushi vinegar I use 2 tbsp of rice vinegar, a little sugar and a little salt (to taste, and I don't like to use too much sugar or salt!). I used the rice to fill some inari (Japanese tofu pockets), which you can buy already made from Asian stores. This time I also put a piece of avocado inside each inari, but this is not exactly 'traditional'.


And then I made some norimaki (large rolled sushi). To be honest this is not my best rolling, but it wasn't planned either! The truth is that there were 8 inari pouches in the packet, but I broke 4 trying to open them :-P!! I made a bit of a mess, not something to photograph! The children and I ate them while we were making them. I quickly rolled the reaming rice with a sheet of nori seaweed, and fill it with avocado, cucumber and red capsicum strips. Serve with wasabi, pickled ginger and Japanese soy sauce.


Pickles


This was the easiest thing: I just bought it! Japanese pickled cucumber, crunchy and refreshing.


Seaweed salad


I found a punnet of seaweed salad in the Asian store, ready to eat. I rinsed it (just in case), and I made a dressing with:
2 tbsp Japanese rice vinegar
1 tbsp Mirin (sweet cooking sake)
1 tsp toasted sesamy seeds

and decorated the salad with calendula petals.


Zucchini and Zucchini Flower Tempura


Once again I used ready made Japanese tempura mix (available in Asian stores, but also in many supermarkets in NZ). Just add very cold water and stir, not too much. Do not over-soak the vegetables in batter, just a little dip is enough, and make sure that the oil is very hot before frying. I used rice bran oil. The zucchini and flowers are from my garden, the fresher the better, I just added a sprinkle of salt before serving them. I did have some batter left and so, after taking this photo, I used it up to fry up some borage flowers as well (maybe you can see them in the first photo). They were lovely!


Dessert

Photos by Alessandra Zecchini ©
Usually after a Japanese meal the only sweet thing served is seasonal fruit, so that was also easy ;-)

Thursday, December 31, 2009

The great vegan cupcake and other coconut butter stories


My friend Claire gave me some organic coconut butter. It was pure white and smelled delicious, like an expensive hand cream. But the only thing I can do with coconut butter is vegan puff pastry, and that's take time...also it is too hot now to make puff pastry! I wanted to try something different.


For my first experiment I tried some muffins, and used some standard ingredients: egg, sugar, milk, self rising flour...and coconut butter instead of normal butter.

Well, what can I say, they were...ok, but nothing more. The fact is that they were too rich for my taste (I am extremely fussy), too 'greasy'. They were eaten, of course, by family and friends, but I wouldn't make them again, so I won't bother with the recipe.


I gather that if coconut butter is so rich, maybe I could try to bake something without using other 'rich' ingredients like eggs and milk. (And if I failed again I would make hand cream!).
I had some coconut butter in a bowl, so I melted it in the oven. When melted, coconut butter becomes liquid, and very clear.
I measured 150ml of coconut 'oil'. I felt that my muffins would be very white, so I decided to use raw (brown) sugar for colour. Also I felt that, without the eggs, possibly I would not get really 'high' muffins, so I opted for cupcakes, used cupcake paper cups and planned a topping.


Vegan Cupcakes with Coconut Butter

Ingredients
150 ml melted coconut butter
100 g raw cane sugar
200 g self-rising flour
150 ml water
few drops of pure vanilla essence
Cherry jam

Using an electric beater mix the still warm and melted coconut butter with the sugar, then add the self rising flour and water, making sure that you don't get any lumps. Finally add a few drops of vanilla and divide the batter into 12 cupcake cases. Top each cupcake with a little cherry jam.


Bake at 180°C for approximately 20 minutes (check with a toothpick to see if the cupcakes are cooked). They will look quite pale! I tried one hot, then cold, They were light and fragrant, with a subtle hint of coconut. They keep soft for two days, after I don't know, we ate them all!


Decorating


No much time to think about this actually, I had guests for dinner and I was too busy with the main and dessert to indulge in further experiments. But I had some ready made Wilton Decorating Icing which, by reading the ingredients, looked vegan to me...so I just used that and a fresh cherry.

I rarely use ready made icing, and if I do it is generally white. Possibly next time I will just make some butter icing with coconut butter and sugar syrup, or just coconut butter and icing sugar. When I get more coconut butter, that is :-)! For now I am content with the cupcake "base", toppings will always change!


Photo by Alessandra Zecchini ©


Weaving, and Happy New Year


A lifetime ago I used to be 'artistic'. I studied art, I painted, then I moved to textiles: printing, natural dyeing, weaving, embroidery... I learned to weave in Japan, and when I moved to New Zealand I got myself a loom, big and old, impressive. That was about 12 years ago...

And then the children came, from art I moved into writing, and food, and the loom was used twice. This is the second project I have on it...a scarf with beads, very fine, a simple exercise really (if it wasn't for trying to insert beads from time to time), and yet unfinished.

We are wanting to move my home office upstairs, in the 'loom room' (how we call it) and to make space the loom should go...to a better home. To someone who would use it, a better weaver!

But after taking this decision I was filled with regret and sadness. I may not have time to weave now, nor in the next year, as I plan to spend at least 6 months overseas, but I still want to keep my loom!!!

Textiles were my first love. Maybe one day...who knows? My New Year resolution is to find a space for a desk without selling the loom :-)
And perhaps to finish my scarf?

Happy New Year to all!

Alessandra


Wednesday, December 30, 2009

Artichoke Risotto with Baby Yellow Zucchini and Flower


Photo by Alessandra Zecchini ©

Ingredients
2 artichokes
Lemon juice
2 garlic cloves, peeled
1 cup Italian parsley
Salt to taste
Extra Virgin Olive oil
1 shallot
500 g arborio rice
500 ml vegetable stock
5 yellow baby zucchini (as small as a finger) with flower still attached
Calendula petals to decorate

Serve 6

Cook the artichokes one day earlier. In a bowl filled with water and lemon juice wash the artichokes and cut out a few of the hardest leaves (petals). Finely chop the garlic cloves with the parsley and a little salt and then use to stuff the artichokes. Place in a small saucepan, drizzle with olive oil and cover halfway through with water. Simmer until the outer leaves easily detach from the heart, adding water from time to time if necessary. The water will make a lovely broth.

The day after scrape all the flesh from the hardest outer leaves and place in a small saucepan with the artichoke hearts and their water (discard the hard bits). Mush flesh and hearts with a wooden spoon, and gently reheat. Keep warm and set aside.

Finely chop the shallot and sau with 2 tbsp of olive oil. Add the rice and when this is lightly 'toasted', add the artichokes and their water. Stir and then continue cooking, adding some hot vegetable stock little by little, and stirring often. If the risotto is too dry you may need to add a little more stock or boiling water.

Clean the yellow zucchini, do no detach the flowers, just remove the sepals. When the risotto is almost cooked add the zucchini, gently stir in to cover them completely with the risotto, turn the element off, cover the pot with a lid and let it stand for 5 minutes. The zucchini are very small and should cook with the heat of the risotto.

To assemble, divide the risotto between 6 plates, with one baby zucchini for each plate, sprinkle with calendula flowers, and enjoy.


Monday, December 28, 2009

Sunny Xmas in the bush, with foraging and green dip


Lovely sunny day for Xmas in Auckland, my daughter set the table for us,


and for the fairies in the bush.


I must have been good this year because I got quite a few presents, including a new pairs of gumboots, which I used immediately to get into the garden to pick strawberries and flowers for the table.


I also went foraging in the neighbor property (he is cool about it) to pick some watercress. It is a bit late for watercress, the flowers are already out, but I could still pick some to mix to other greens to make a tasty dip.


Green Dip


Ingredients:
A mixture of watercress, rocket (rucola), and Genovese basil, (or any greens and herbs you like)
3 handfuls of cashew nuts
2 garlic cloves, peeled
1 slice of aged pecorino cheese (optional)
a little water
Salt to taste
Extra virgin olive oil to finish

Blend the first 5 ingredients, then add salt and olive oil to taste. Serve with homemade bread, as a dip or as a spread.


Of course I made other things for Christmas lunch, but I think that I will put the recipes on the blog very slowly. This was the starter.

LinkWithin

Related Posts with Thumbnails