Monday, May 30, 2011

Hello Kitty Quick Bento


I found out about this bento contest yesterday, it is ending on 2 June, so no much time, but since I make school lunches for the kids, and I like Hello Kitty (yes yes I know...) here is a little bento :-)


Actually, the bento comes in two boxes, both pink Hello Kitty, they are necessary because I don't like to mix the fruit with the savoury (and the kids don't like that either). Also, although I love bento boxes with sushi, cooking rice in the morning is not an option for me. I need bento lunches that are quick to prepare!


 In the savoury bento there is a boiled egg, cut into two, 4 miniature sandwiches of Pumpernickel bread, Gruyère and salad (held with Hello Kitty picks), a small tomato, and raw carrot slices cut like flowers: a good mixture of proteins, carbo and veggies.


For the fruit mixing colours is good: green and yellow kiwi, orange mandarine slices and a purple berry. And another Hello Kitty pick.
All very simple really, but presentation matters, and makes food taste better. Also, it is fun to prepare :-).
Of course no Hello Kitty bento boxes for the boy... but the food is the same!


Photos and Recipes by Alessandra Zecchini ©


Sunday, May 29, 2011

Matar Paneer and Weekend Baking


In my garden


This has to be one of the easiest curries ever, and one of the first I learned to make (alongside Dahl and Palak Paneer). The kids love it, they love all curries, especially if they have paneer.


Matar Paneer

Paneer and Pea Curry

1 onion
1 garlic clove
1 tbsp vegetable oil
half tsp each of
Garam Masala, cumin powder, coriander powder, turmeric, paprika, salt
1 bay leaf
 800 ml can of tomatoes
  half a tsp of freshly ground ginger
1 cup frozen peas
1 block paneer cheese
half a cup of cream (optional)
fresh coriander to end


Chop the onion and garlic. Heat the oil in a pan and sizzle the Garam Masala, cumin powder, coriander powder, turmeric, paprika, salt and bay leaf for a few seconds. Add the garlic and onion and sizzle until the onion start to colour. Add the tomatoes and ginger and simmer for 20 minutes, then blend everything with an immersion blender. Add the peas and after 10 minutes the paneer, cubed. Simmer for 5-10 more minutes, then finish with the cream (optional) and some fresh coriander leaves. Serve with rice or Indian bread.


These images are of the afternoon baking with my daughter, we made jam ring biscuits with strawberry jam, and with the left-over pastry Arantxa cut her own biscuits.  She really likes little details :-).

Happy week to everyone!


Photos and Recipes by Alessandra Zecchini ©

Friday, May 27, 2011

Do you like Brussels Sprouts?


About myself I could say that I love broccoli, I like cauliflower, and I eat brussels sprouts. Do you like them? I think that I buy them about once a year, I did plant them once but I wasn't very successful: they opened up like little cabbages (maybe it is not cold enough in Auckland) and they attracted lots of bugs. And nobody in the family is exactly 'crazy' about them. My husband saw my shopping bag and said 'Brussels???'. He wasn't looking forward to dinner. The kids didn't even remember the taste, since we eat them so rarely, but they hear horrible tales about them from other kids: nobody is supposed to like them.


But I love variety, and if I cook the brussels slowly in veggie stock, and maybe with other vegetables, I think that they can be interesting. I put them in vegetables soups, like minestrone, and they don't seem bitter then. This time, instead, I wanted to cook them with other brassica, so a made a big brussels/cauli/broccoli mix.


Brussels, Cauliflower and Broccoli mix


I sauteed a garlic clove with a little olive oil, then I added my brassica: brussels and cauliflower florets first, and the after 5 minutes, the broccoli. Stir well during this time, you don't want to burn your brassicas!! Then I added 250 ml of vegetable stock, lowered the heat, covered with a lid, and cooked the lot until the liquid was absorbed. They can be used as a side dish, but also with pasta, or to fill a pie. They were eaten no problem, with comments like: "Cooked like this they are not bad..." which probably meant "Ok I'll eat them, but can we have pizza tomorrow?"


Quick Cheesy Brussels Quiche


Well, my husband approved of this one: you can't even see the sprouts :-) !! I used some ready made puff pastry as a base and arranged some of the brussels from above. I added about half a cup of grated edam cheese, and then mixed 3 eggs with one cup of vegetable stock and poured it on top (no cream, vegetable stock works well if you like to cut the calories just a little :-). Bake at 180°C for about 30 minutes and serve. Really really yum!


Maybe I will not have anymore brussels for another year, I'll wait for better brassica to fill my garden (like cavolo nero, my favourite) and other veggies too, but sometime it is nice to change, and I have to say this: brussels are not that bad, and they look really 'doll-house' cute. Plus I enjoy the challenge of making them taste good to children... of all ages.


Photos and Recipes by Alessandra Zecchini, Artwork by Arantxa Zecchini Dowling ©


Wednesday, May 25, 2011

Red Wine Risotto, Step by Step


I tend to use white wine for risotto, and no more than a glass, so this is a bit different. I had half a bottle of nice Otago Pinot Noir to finish, a real leftover which couldn't really be drunk. And I saw this recipe by Tamara, the queen of risotto! Tamara told me that as long as the wine didn't taste vinegary, I could use it, and so I did, maybe a little differently from her, but using the same pot, Le Creuset, which is great for making risotto.


Because the risotto was going to be red(dish) I also used a red onion (I alway use white for risotto, and brown if I cannot find white onions), and a big chunk of salted butter. Risotto tastes good if you start with some good fat, sorry! The butter in NZ is quite fat and tasty, and salted!  First sauté the onion, then add the rice (about 400 g of Arborio, it was for 4 people) and sauté the rice too: it has to be hot before you add the liquid! 


I put the wine in, didn't measure, possibly 300 ml or so, I didn't want to overdo it, as it was lunch after soccer practice for the boys, and my kids are still young!


Once the wine had evaporated I started adding the vegetable stock, little by little, stirring often. I know that there are no-stir risotto around, but with arborio do stir, and a risotto which is stirred is way superior in taste!


I keep the pot with the hot stock close to my risotto, I needed almost a litre of stock, maybe about 700 ml, it is good to have plenty just in case.


Yum! The risotto was ready in 20 minutes, and smelled and tasted great!


Everybody liked it, the Brussels sprout on top is just there as decoration, I had some from a different recipe (maybe next post?), but that cute little 'cabbage' went well with the risotto too! Serve with grated parmesan, if you like.


Photos and Recipes by Alessandra Zecchini ©


Monday, May 23, 2011

Banana Flower Salad, step by step


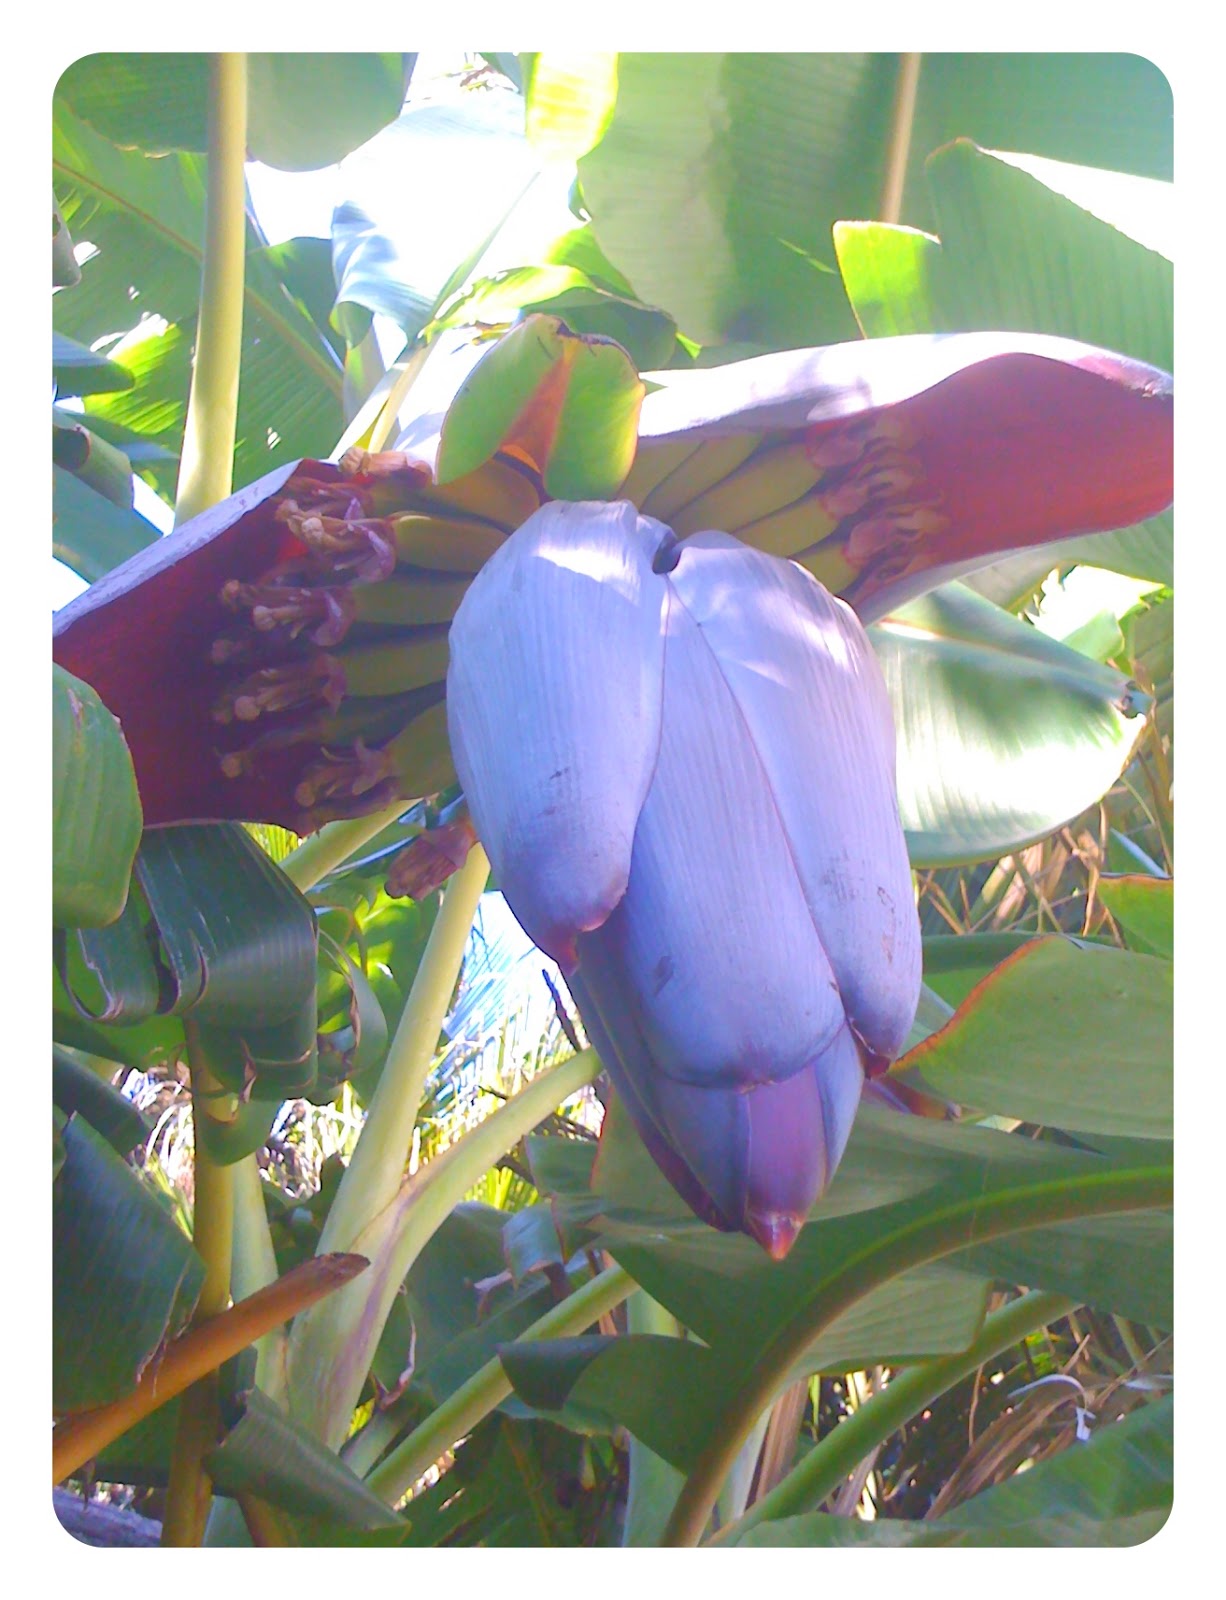
Some of you may remember that I showed you my banana plant a few weeks ago. Well, there are green bananas now, I read somewhere that it is good to cut the flower off, and wrap the bananas with blue plastic. I did just so, thinking that it is getting cold here, and maybe I won't get any bananas... and then I thought of, at least, eating the flower! I looked in all my books but I could not find a recipe, and yet I remembered eating banana flower salad ages ago, somewhere in Asia... I checked on the net, I found a few recipes, and the one that I most liked was this one. Of course I did a few variations, according to my taste.


Banana Flower Salad

Ingredients
1 banana flower
Juice of 2 lemons
1 clove of garlic
1 fresh chili
2 tsp sugar
1 tsp salt
A few leaves of Vietnamese mint
A few leaves of coriander
1 large potato, peeled and cubed


First juice the lemons and keep the juice at hand. Start peeling the flower, removing all the purple and pink petals, and the flowers that you will find underneath, (apparently you can eat these too, but they need some fiddly cleaning which I didn't feel like doing, and the taste wasn't too strong or appealing.


Work on your flower until you get to the centre and you cannot remove anymore petals, but keep the petals aside for later.


Finely chop the banana flower core, sprinkling it with lemon juice as you go, since there is a sap that will quickly turn your bud black.


The leaves can be washed and dried and used as plates.


Put the chopped banana flower in a bowl and add the remaining lemon juice, the sugar and salt, the Vietnamese mint leaves. Finely chop the garlic, chili (I used a yellow one, but I removed the seeds) and coriander, and add to the salad.


The salad need to marinate for a few hours, otherwise it will taste really astringent, a bit like unripe persimmon.


To speed up the marinating process I pressed the salad down with a weight (in this case another bowl full of water. But I knew that it would still be a little astringent, so I decided to solve the problem by adding a potato. I peeled and cubed a big potato, and boiled it with a pinch of salt. Then I drained it and let it cool down.


I waited about 4 hours, then I stirred the salad well, drained off the excess liquid from the marinade (quite a bit), added the potatoes and stirred. I put everything inside four banana leaves, and served it as an antipasto to my family.


The verdict? They loved it, even the kids, they recognized the Vietnamese flavours in it (they loved Vietnam and its food) and they liked the texture and the fact that it was our own banana flower! Now they just hope that the bananas will ripen too, and that the other banana plants will also flower.


Photos and Recipes by Alessandra Zecchini ©

Con questa ricetta partecipo a Chi mi aiuta a raccogliere l'insalata? di
Burro e Miele. Sicuramente non facile da rifare in Europa, ma nella vita non si sa mai!


Sunday, May 22, 2011

Rhubarb Meringue Mini-pies (or Cupcakes) and Rhubarb Smoothie


A Nikau palm leaf fell on my rhubarb plant, the hazards of living in the bush. I rescued what I could, the rhubarb plant will regrow, for sure, but I had a few stalks to use, quickly. I cut some of the stalks and cooked them quicly with very little water and one tbsp of sugar. In the meantime I got some sweet short crust pastry out of the freezer (this is very convenient when I have to make something sweet in a hurry) and I cut it with cookie cutters. I lined the back of my cupcake trays (regular and mini cupcakes) with cupcake cups, and placed the 'biscuits' on top. 


This way, when the pastry bakes it takes the shape of a small pastry container. Let the pastry cool down, then gently lift it out of the paper cups, reverse the same paper cups, and place the pastry inside, ready to be filled.


To make the meringue topping I used the syrup from the rhubarb (I added one more tbsp of sugar and boiled it down a bit). Pour the hot syrup, slowly, over the whipped egg whites while beating. Then spoon some on top of each little tart. I had some meringue left over, so I just added some icing sugar to make it stiffer and made some Rhubarb meringues too.


Bake for about 20-30 minutes on low, the topping should be still soft, and just start to brown. I left the normal meringues in the oven for one hour longer, and then I let them cool down in the oven until dry.


I did keep some rhubarb raw, just to make a smoothie. I got the idea from Vic of The Life and I wanted to try. I used some apple juice, a banana, and a couple of stalks of rhubarb (raw). It wasn't too pink, but the taste was really nice, and I will try again once the plant is back into shape.


I leave you with this picture my daughter made on my iPhone, using the ArtStudio Lite (a free application). She has been 'painting' so many flowers, I got quite a collection, I think that they are lovely, but of course I would think so. What do you think?


Photos and Recipes by Alessandra Zecchini, Artwork by Arantxa Zecchini Dowling ©


Friday, May 20, 2011

Food in a minute


Tropical Smoothie


1 ripe mango, 1 large banana (or 2 small ones), 500 ml pineapple juice, blend everything and then serve with a slice of papaya. Serves 4.


Chinese Vegetables with Cashew Nuts


Any vegetable is good, but I used a few dried shitake mushrooms (2 or 3 per person), bok choy, and carrots. Soak the mushrooms, cut the bok choy in big chunks, and the carrots into fat strips. In a pan or wok heat 1 tbsp of vegetable oil with 1 tsp of sesame oil. Add the mushrooms (keep the water aside for later), sizzle for a few minutes, then add the carrots, and after 2 minutes the bok choy (first the white stalks, then the green leaves). Add the cashews (about 2-3- tbsp) and stir. Mix the mushroom's soaking water with 2 tbsp of soy sauce, 1 tsp of corn flour and half tsp of grated ginger. Add to the vegetables and stir until the sauce thickens. Serve immediately with rice or noodles.

Photos and Recipes by Alessandra Zecchini ©


Wednesday, May 18, 2011

Vegan Pasta with Pesto, Potatoes and Cannellini Beans


I peeled two medium floury potatoes (like agria) and sauteed them in a pan with a little olive oil, then I added a pinch of salt, a little water, and a lid! Simmer until the potatoes are soft, then add the content of a can of cannellini beans. Simmer until all the liquid has been absorbed and keep warm.

 I made the pesto with a mortar and pestle: basil, garlic, salt and olive oil (no cheese, this is a vegan pesto). I cooked the spaghetti (would have been nice to have trofie pasta, but never mind...) and then drained them al dente and straight into the pan with the potatoes and beans.

Finally I added the pesto and tossed everything together. To some it may be strange to see pasta and potatoes in the same dish, but this dish is not uncommon in Italy, and for me it is a great way to make a one pot dish when I have little time. Incredibly filling!


Photos and Recipes by Alessandra Zecchini ©

Monday, May 16, 2011

How to cook Zaru Soba


Kazuyo brought back some soba from Japan, three packs for me :-)! I love soba, the Japanese buckwheat noodles that can be eaten cold or hot.


When we were living in Japan my husband did a lot of editorial work for Kodansha International, and among the books he worked on there was this one: The Book of Soba by James Udesky. The book tells you how to make your fresh soba, but also how to cook the dry one, plus it has some recipes, some history and nutritional info. I like it.


This is my soba set: plates with fitting straw mats (zaru soba is served in baskets or on mats, to keep it fresh and drained), plus some matching soba dipping bowls. I also have some tea cups with the same pattern: dragonflies!


Zaru soba is cold soba topped with nori (I cut a sheet of nori in small pieces with a pair of scissor) and served with a simple dipping sauce and garnish. One thing that I learned form The Book of Soba is that soba is not cooked like pasta. The only thing in common with pasta is that you should use the biggest pot you have and have enough water as if you were to cook spaghetti. But don't add salt!

Bring the water to boil: add the soba, stir gently. When the water starts to froth add half a cup of cold water and lower the heat. Do this three times. After the third time your soba should be ready. Drain and collect the cooking water to make soup, if you like (full of starch and vitamins and minerals) and place the soba in a bowl with ice water. Or just rinse under cold water (I prefer this way, the soba may not be perfect but I cannot bear to loose anymore starch!


Place your cold and rinsed soba in a soba basket or on your soba plate (lined with the soba mat). If you don't have a soba mat use your sushi rolling mat. Top with nori. Here I put some daikon salad with ume mayo, and sesame capsicums on the side too, they are not traditional, they were just left overs from my Japanese cooking class, but they paired well with the cold soba.


For the dipping sauce I prepare a base broth by simmering a piece of kombu for 30 minutes in water, then I add a little soy sauce (most would use bonito flakes). Let the broth cool down: this is a cold dipping sauce. Before serving put a tiny bit of wasabi in each dipping bowls, and a little grated daikon or radish, and then some chopped spring onions or chives. Pour the broth over and stir. For a fancy dinner place all the garnishes in small plates and let your guests mix their own sauce. To eat pick up the soba with your chopsticks and dip into your dipping sauce, then slurp everything up. You can make a slurping noise too, but I am not good at that!

Photos and Recipes by Alessandra Zecchini ©


LinkWithin

Related Posts with Thumbnails