Thursday, June 30, 2011

Funghi!


I like mushrooms but I find than champignons have very little taste. I guess that I grew up with wild mushrooms (and lots of porcini) so maybe I am a bit of a snob... still, champignons are easy to find and I tend to use them as a 'base', adding other dried mushrooms for extra flavour.

I had a handful of dried porcini and another of dried Chinese black mushrooms, and I soak them in water for 30 minutes. In the meantime I cleaned and chopped 400 g of champignons (I tend to discard the stalks of the champignons, not sure why, but I learned to do it ages ago in Italy and I keep doing it).


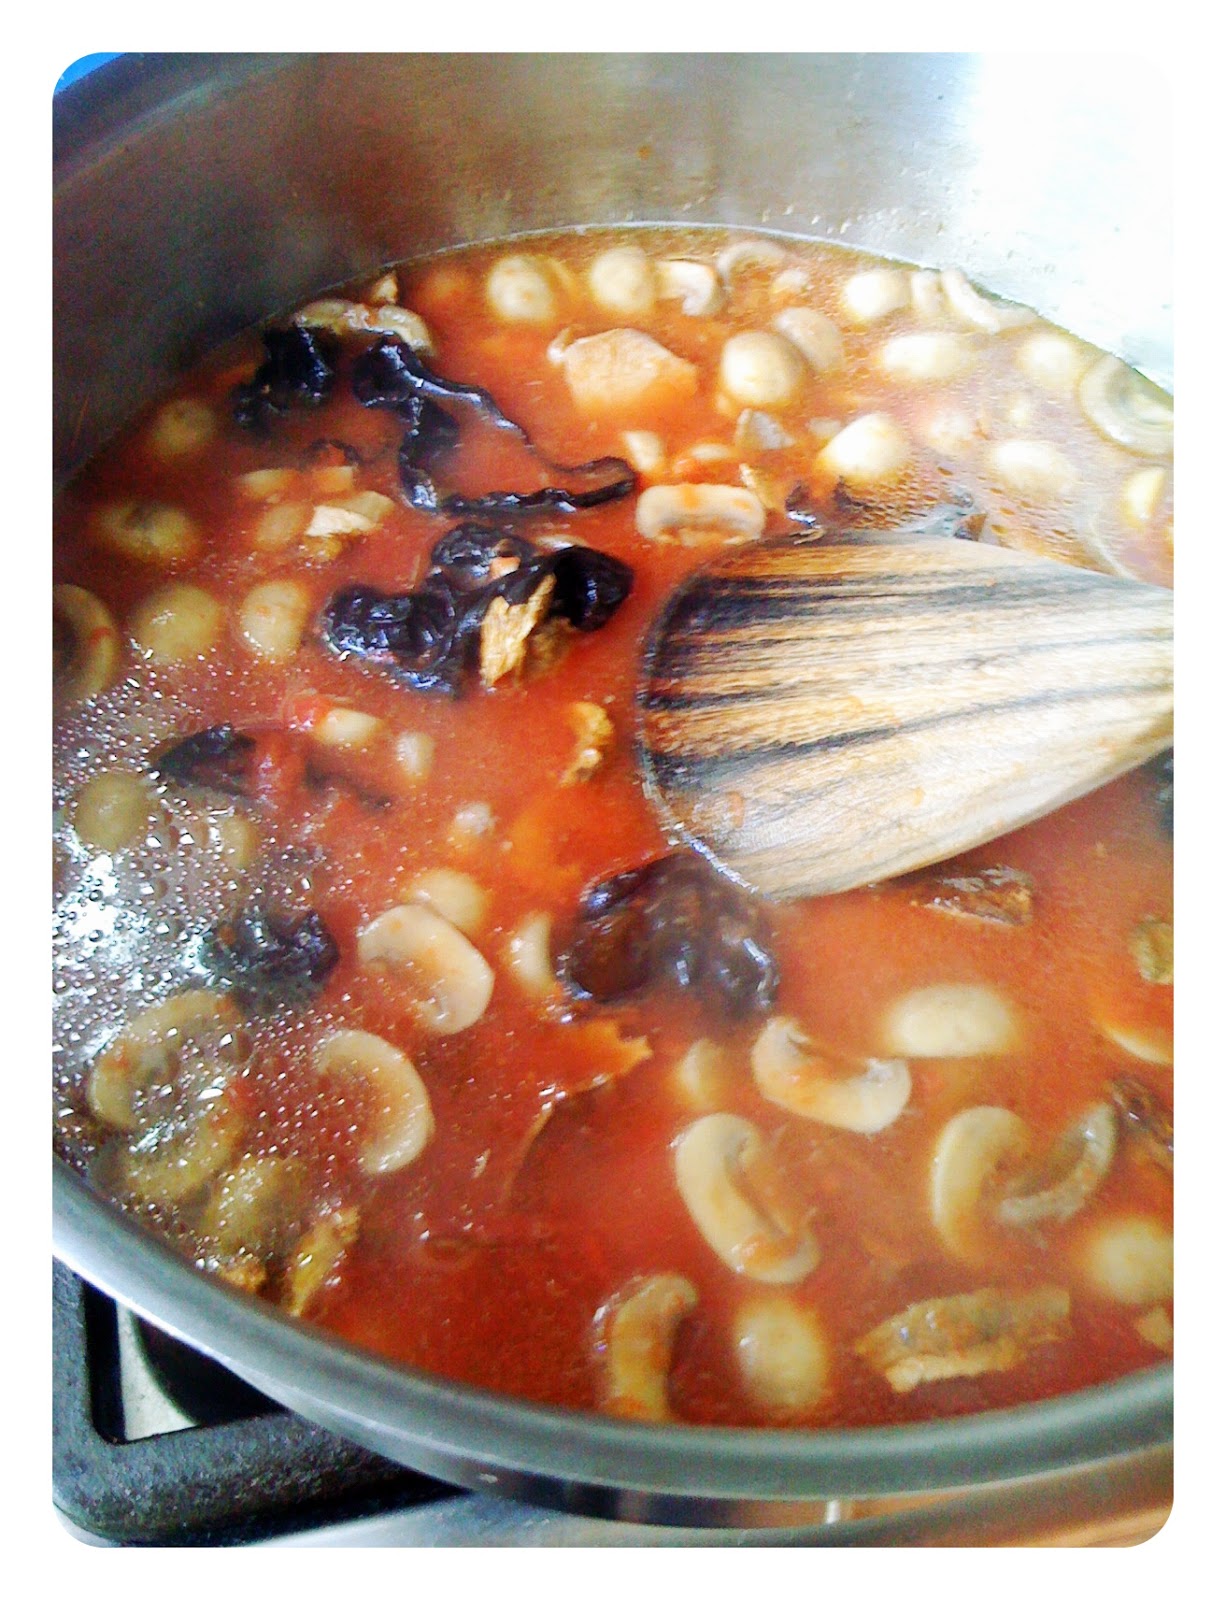
I heated some olive oil with a few cloves of garlic, then I added the champignons and some salt. I cooked the mushrooms until all their water was gone (abut 20 minutes) then I added the dried mushrooms and their soaking water. 


After 5 minutes I added the content of a can of finely chopped Italian tomatoes, and some more water from rinsing the can (another 400 ml).


I let the mushrooms simmer, covered, for about one hour (yes that long) until almost all the liquid was gone. It may seem like a long cooking time, but it is winter after all, and it is nice to have a pot simmering on the stove :-).


At the end I added some fresh parsley chopped with a clove of garlic, (about one tbsp in all). I served it with crescentine (as one of the fillings, usually I always have one hot filling for them), but it works well on polenta or pasta, or as a side dish, or as a pie filler.


Photos and Recipes by Alessandra Zecchini ©


Wednesday, June 29, 2011

Small Sweet Vegan Treats


Mango Agar Agar Flowers


Mango pudding is a staple at home, and the kids like to take it to school for lunch. For the lunch boxes I usually cut it into squares, but just for fun this time I used some little flower cutters. Agar agar is easier to shape and cut than jelly, and it is healthier too. The basic recipe for mango agar agar pudding is here.


Hazelnut Gold Chocolates


Toast some hazelnuts and remove the skins, then drop into some melted dairy free chocolate, the darker the better. Collect 3 hazelnuts at the time and let them set together (I also spoon just a little more chocolate on top to make it more like a proper chocolate). I had a very little edible gold paper left from an old job, so I sprinkled some on the chocolates. It didn't give it any particular flavour, I must say (maybe I had too little?), but it looked pretty and sophisticated :-). Unfortunately is was dark by then and the photo is not too clear, the flash also made the chocolate look less dark that it actually was. Still, everything got eaten pretty happily!


The last image is more chocolate, but I don't think that I will be cooking with this one!!! My husband brought it back from Latin America this morning, single origin special dark form Ecuador, I tasted a bit... uuhh! Intense chocolate heaven! Form Republica del Cacao.


Photos and Recipes by Alessandra Zecchini ©

Tuesday, June 28, 2011

Smoked Paprika Chickpea Snack


I am used to Italian cats eating almost anything, but New Zealand cats seem to be fussier, so I was very surprised when Marameo jumped on the bench to grab the cooked chickpeas that I was rinsing. I had to give her some, she could not wait, and ate them all. I gave them seconds and then she stopped bothering me. Strange cat! 

With my remaining chickpeas, I wanted to make a spicy snack for this event,
 promoted by blogger Araba Felice in Cucina.
I had to chose among one of her wonderful recipes, and make it at home (variations allowed), and I have been thinking of trying this one for a while now.


Smoked Paprika Chickpea Snack


The original recipe calls for:
400 g can of chickpeas,
1 tbsp flour
1 tsp sweet paprika, or your favourite spice (in my variation I used smoked paprika instead)
1 tsp salt, about
2-3 tbsp extra virgin olive oil
I also added a few cumin seeds.


Rinse and pat dry the chickpeas, and mix with the other dried ingredients until the chickpeas are nicely coated. At this point I left the chickpeas in the bowl for about 30 minutes so that the flour and spices could really get 'caked' around each chickpea.


Pour the olive oil on a baking tray (no baking paper), add the chickpeas and roll them around so that they are not one on top of the other. Bake at 200°C, rolling them on the tray again from time to time to make sure that they get crispy all over. The original recipe says 30 minutes, but my canned chickpeas were quite small, I though, so 20 minutes were sufficient. Serve as a snack, warm or even cold (I think that they will go well with beer so I will make them again when my husband is back!)


But this time I just put them on the table for dinner (we didn't have time for a pre-dinner drinks, I rarely do during the week anyway, and without the husband organizing the drinks) so the chickpeas became 'part' of the meal, which was Indian: basmati rice with silver beet panir and flat bread, and mango lassi to drink. We ate the warm chickpeas with our fingers, but we also put them on our rice with the curry, and they were great! Thank you Araba Felice :-)


Photos by Alessandra Zecchini ©

Monday, June 27, 2011

Tiramisù ai Frutti di Bosco e Nuvole, Cloud-berry (or Berrycloud) Tiramisù


I saw the name Cloudberry in the New Yorker, it wasn't a recipe, just an article with someone ordering Cloudberry Gelato in Aspen. I like the name, it reminded me of a Tibetan restaurant in London years and years ago where all the dishes had something to do with clouds, dragons or heaven. Astrofiammante just told me that the cloudberry is yellow, this one? Incredible! I planted it in my garden years ago, made lots of leaves and not a single berry! No yellow berries for me, so I changed the name of this dessert to Cloud-berry Tiramisù, or maybe it would be better to call it Berrycloud Tiramisù... and as I had some friends over for crescentine, I decided to also test my new dessert, and its name, on them :-).

A little edit, I added an Italian name to the dessert, the translation sounded really romantic.


Tiramisù ai Frutti di Bosco e Nuvole
Cloud-berry (or Berrycloud) Tiramisù

Ingredients:

1 heap cup of mixed frozen berries (use the real cloudberries if you have them!)
2 tbsp whisky (a good one)
1 tsp sugar + 3 tbsp sugar
1 packet of savoiardi biscuits
3 large free range eggs
300 ml cream
Cocoa to dust
Friends for sharing, including one who can clean the bowl in the end.


Place the frozen berries in a bowl with the whisky and 1 tsp of sugar. Let the berries defrost at room temperature, they will make lots of juice. Strain and collect the juice to soak the savoiardi. Use only half of the savoiardi, making your first layer in a 20 x 20 cm square and at least 5 cm high (or similar size rectangular) serving dish. Place all the berries over the biscuits, but leave some berry juice aside for the second layer of biscuits.
Please note: it is important not to over-soak the biscuits or the base will be too soft. Just dip them quickly on one side only (the sugary side is better), and place them in the serving dish with the soaked part facing up: this way the juices will slowly go through the biscuits.
In the meantime separately whip the egg whites, then the egg yolks with 3 tbsp of sugar, then the cream.


Whip everything well, the egg whites should be really stiff, the egg yolks really pale, and the cream like a cloud. Finally mix all three together and give them a final whip (not a fold, but a good whip!). Pour half of the cream mixture over the red savoiardi biscuits, then make a second layer of savoiardi dipped in berry juice (always dipping one side only, and placing them on the cream red facing up). Cover with the remaining cream mixture and place in the fridge for a few hours. Before serving dust the 'cloud' with cocoa. I would say that it serves 12, but we were 7 and most had seconds, so it all went.


The name was approved but be warned, these are the side effects:


Photos and recipes by Alessandra Zecchini © except the last 2 which they managed to take themselves with Photo Booth

Saturday, June 25, 2011

Rice Paper Salad Rolls


Bored with the same side salad? Can’t get the kids to eat it? Maybe you need to roll it up! I did this because I had a few sheet of rice paper to use, just about a dozen, not enough to make a meal, but enough for some fun side veggies.


Ingredients:
Cooked green beans
Cooked carrot sticks
Mesclun salad
Rice paper
Sweet chili sauce to serve

Follow the instructions on how to soften, fill and roll the rice papers here.


These were a hit with the kids, they like salad, but they had more fun eating it this way
:-), so I will add this recipe to Eleonora’s collection at “Chi mi aiuta a raccogliere l’insalata?”


Photos and Recipes by Alessandra Zecchini ©

Friday, June 24, 2011

Some Gluten Free Variations


Rice croquettes and ramen soup are some of my favourite quick meals, these versions are gluten free.


Gluten free rice croquettes

I always make croquettes with leftover risotto or other cooked rice, and I thought that they would be a lovely vegetarian gluten free dish if I didn't use breadcrumbs. So I started to coat the croquettes with instant polenta flour instead, for a golden and crispy 'crust'.


Ingredients: Leftover risotto (any type) or cooked rice with vegetables, 1 egg to bind everything together, some instant polenta flour to roll the croquettes in, vegetable oil for frying (I use rice bran oil).

Mix the rice with the egg and then shape into small croquettes (this is easier to do if you wet your hands with water first). Roll the croquettes in the polenta flour and fry. I served these coquettes hot with mashed potatoes, but they are also good cold and can be put in the lunch box.


Miso Ramen with Rice Vermicelli


I collected the last bok choy from the garden, they were just baby bock choy, but the snails weren't going to wait for them to grow up! Baby bok choy is perfect for ramen soup.

Ingredients for 4 bowls of ramen: 8 dried shitake mushrooms, 1 small carrot, 4 baby bok choy, 1 pinch salt, 1 pack rice vermicelli, miso paste, 4 eggs.

I cooked the shitake mushrooms first in 1 litre of water with a small pinch of salt, when they were soft I added the carrot, sliced, and the bok choy. I simmered everything for 5 more minuted and then I collected the vegetables and kept the stock in the pot. I added the miso to the stock and kept it hot but not boiling.
In the meantime I cooked the rice vermicelli in hot water (they just take a couple of minutes) drained them and divided them between 4 bowls. I arranged the vegetables on top and then I added a raw egg for each bowl. I poured the hot miso over and served immediately. The egg white will cook with the hot stock, but the yolk will remain soft. If you prefer not to eat raw egg just add a boiled egg (halved) instead, or for a Vegan variation substitute soft tofu for the eggs.


Photos and Recipes by Alessandra Zecchini ©


Tuesday, June 21, 2011

Pizza al trancio con pomodorini in scatola


Since recently there has been some talk about bloggers' getting payed or sponsored, I better just say that I didn't get payed, not receive canned tomatoes for writing this :-). This recipe is for Cucinando con mia sorella's contest. As it happens tomatoes are not in season in New Zealand, and I actually use Italian canned tomatoes from Mutti.


As a matter of fact I have been using Mutti since I left Italy, when I could find it, that is! It was ok in London, more difficult in Japan, and now I can get it in New Zealand and my pantry is a bit like the one of an Italian immigrant: dry pasta and canned tomatoes better came from Italy!


For this pizza slab I used the canned cherry tomatoes. I made the base (recipe here) but also added a tbsp of wheat gluten (these days I find that High grade flour is not 'strong' enough for making pizza). After 2-3 hours I rolled the dough on a large baking tray, then I put the canned cherry tomatoes on top. This way when the dough rises the tomatoes stick to their places. If you put them on just before baking they may roll off.


After 30 minutes (the dough had risen quite a bit) I added the tomato juice from the can, salt, olive oil and oregano. I baked the pizza in the oven at 240°C for 15 minutes, then I added black olives, cheese (I used edam, as I didn't have mozzarella) and artichokes in oil. I put the pizza back into the oven for other 10 minutes. Ready!


Photos and Recipes by Alessandra Zecchini ©


Monday, June 20, 2011

Slow Food Waitakere and Canederli with Cheese and Onion Sauce


Yesterday we had the Slow Food Waitakere AGM at my place, followed by brunch, which was actually a long lunch! Everybody brought food and drinks, and it was such a great spread! So lovely to have so many good Slow Food friends who happen to be good cooks too!


And now for the recipe of the day: Canederli (Knödel in German) is something my Mum made often when I was a child. There is no strict recipe because they are made with left-overs, and the base is left-over bread. But here you can find my basic recipe, with step by step instructions. I really prefer them in a broth, but the other day I wanted to make them with onions and cheese, I didn't think of publishing them on the blog as the photos are not exactly pretty, but my husband loved them! He said that he actually preferred them served this way! Once again left over bread was put into good use!


Canederli with Cheese and Onion Sauce


Prepare the canederli and cook them in a light vegetables stock (instructions here). Peel and finely slice 4 onions (white or brown) and simmer them slowly with a little olive oil and salt. I cooked them in my Le Creuset pot, on low and keeping the lid on, for about 45 minutes. I added a little stock from the canederli from time to time, but just a drop. When the onions were as soft as butter I added the canederli (cooked and drained, keep the stock to drink!), I grated some edam cheese on top, added a sprig of fresh sage and put the lid back on for 5 minutes. Then I served them, with lots of sauce. Yes, they were perfect and filling for a winter evening!


Photos and Recipes by Alessandra Zecchini ©

Saturday, June 18, 2011

How to make Labne Balls


Lebne cheese is basically strained yogurt. I use Cyclops organic yogurt (green top) which I find to be the best for making labne. Use think plain yogurt which is just yogurt (no added gelatin or other thickeners).


To strain the yogurt I used a cotton cloth, not too fine, but finer that a muslin cloth or cheese cloth. Tight well and hang in the fridge with a container underneath to collect the liquid. Leave it for at least one night and one day. Two days if you can.


Here is your labne: you can spread it on bead, or spoon it on salads or hot food or nachos, but what I like best is to make little labne balls. Oil your hands with olive oil and shape small balls (about the size of a walnut). Add some more olive oil, salt and herbs or spices, like cumin seeds, coriander seeds, chili flakes, garlic, bay leaves, pepper, smoked salt, or anything that takes your fancy! I also like to roll them in dukka! If you fill a jar with olive oil to completely cover you labne balls, and add a few peeled garlic cloves, it will last several weeks.


Photos and Recipes by Alessandra Zecchini ©


Friday, June 17, 2011

Round and Thin TimTams (Too easy and too tasty to be allowed?)


In case you don't know Tim Tam is possibly New Zealand most popular biscuit. I like the idea of a biscuit sandwich with chocolate, but I wanted a 'lighter' version, homemade. I set to work with my 10 years old Max, using as the base some plain water thin crackers (my favourites!). In the centre we just put some hazelnut chocolate spread (like Nutella) and then we made little biscuit sandwiches. We placed the 'sandwiches' in the freezer for 30 minutes, then we dropped them in melted dark (72%) chocolate. Max loves dark chocolate but found dipping the biscuits in the hot stuff a bit too hard, so he took the photos for this step. Let the chocolate set at room temperature and then, if it is a hot day, store the biscuits in the fridge.


The verdict? This is too easy, and too tasty to be allowed!!!!


Photos and Recipes by Alessandra Zecchini and Max Zecchini Dowling ©


Con questa ricetta Max ed io partecipiamo al concorso di Gianni
Cucina a Prova di Bambino nella categoria "preparate con loro".
Grazie Gianni!

LinkWithin

Related Posts with Thumbnails